
Written together with ReBrainMe
The command-line shell is used for any server manipulation. There are many ways to configure servers. It’s important that it’s comfortable for the administrator, but the main thing is that it’s efficient in terms of time, effort, and cost. The command line can be colorful, with arrows of different colors showing the path to the current directory, time, CPU load, and other stuff. Here’s an example from here:
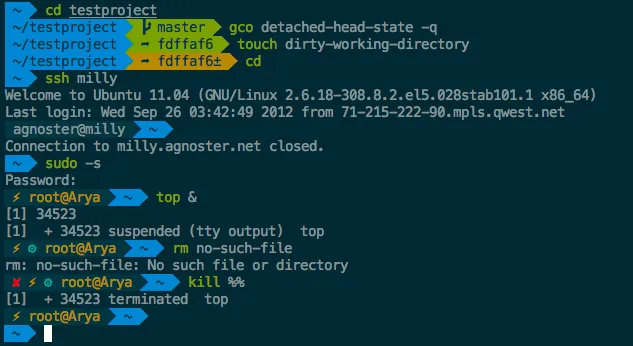
It’s beautiful, yes, but too many colors distract from the essence. Also, the Git repository branch is displayed, taking up vital space on the left, though it could be moved to the right.
Command Line Shells 
Shells come in different types, though they solve the same problems in very similar ways, they are configured differently and have different functionality. Try different ones and find your own! … or write one yourself.
- bash – the de facto standard shell, with basic autocompletion and path completion, included in most distributions by default, often used as a script shell.
- fish and zsh – two different shells that greatly surpass bash in functionality, often heard of.
- ksh, tsh, csh … other shells, which may be just as good or even better, but are slightly less common.
The goal of this article is to subjectively figure out what really needs to be in the terminal window and suggest a solution based on zsh.
What is needed for the command line to be effective?
Shell Requirements 
- Path autocompletion. This is undeniably the main feature needed for navigating directory trees. It may seem that Bash has path autocompletion by default by pressing Tab twice. Try Zsh – you only need to press Tab once, a small thing, right? Now go back to Bash :) Additionally, Zsh can be configured to display a list of files matching the given prefix, which eliminates the need to interrupt input and run ls -la, you can even select the option with arrow keys. This is not used often, but it’s convenient.
- Command history search. If you’ve already switched to ranger, this might become the most important requirement for you. At first, we learn about Ctrl+R to search for a command in the history of typed commands. Convenient, but not perfect. In Zsh, you can just type a piece of the command and use the arrow keys to select the one you need from the autosuggestions. Subjectively more convenient, and here’s why: to show the next command from history, you need to press Ctrl+R again, which is not very comfortable, especially when you skip over the one you need.
- Highlighting the command prompt. When scrolling through a large number of logs in the terminal from different commands, you start to lose track and spend extra time distinguishing which block of logs belongs to which command, where the command itself is, etc. Highlighting the command prompt is really necessary, but not in a way that overshadows everything. Often, the first thing a beginner changes in a non-standard shell is the contents of the PS1 variable. Here’s a good description of PS1-4 variables.
- Lightweight. Briefly: when you’re on a server where the loadavg is tens of times exceeded, you’ll regret setting up resource-intensive code in motd or the beginning of .zshrc (.bashrc) that outputs extensive CPU, memory, network, disk usage statistics, etc.
- Uncluttered. Even if zsh is chosen for daily use, I write all scripts with a shebang for classic sh because it’s practically everywhere, and the syntax is standardized. In other words, it’s not recommended to write scripts using the non-standard syntaxes of advanced shells, as it will be a hassle to install them on every server.
- Comfort. Efficiency and comfort are closely related. Setting a semi-transparent image as the background or picking fonts to your liking is also very important when you find yourself thinking that ugly fonts and a clunky interface kill your motivation to work completely. Just don’t overdo it.
Aliases 
It’s very convenient to declare aliases to speed up command typing.
| |
And a little humor: alias please=‘sudo’ will make your interaction with the computer much smoother.
Zsh Configuration 
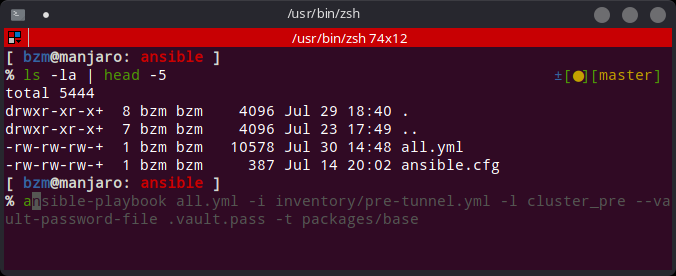
As you can see, each command is highlighted between separators like ; && |, and the command is entered on the second line, after the prompt indicating the current directory and username with host. This makes long commands more readable and manageable. On the right, honestly borrowed from the standard settings shipped with zsh in Manjaro, is the current Git repository branch. If there are changes, deletions, or additions, yellow, green, and red circles appear. Since it didn’t take up much space, it was decided to keep it. Why not.
When typing a command, the last one that matches the prefix is suggested. You can confirm the selection by pressing the right arrow key. The terminal emulator window is Terminator.
To set up and configure the terminal window as in the example, follow these steps:
| |
- Unpack the plugins
| |
- Set zsh as the default shell
| |