Introduction 
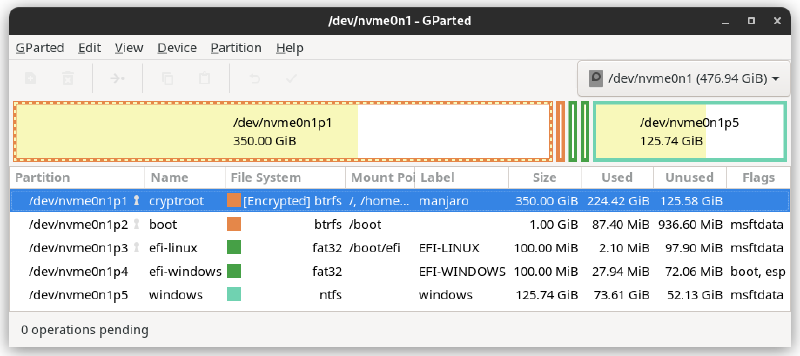
The program in the article’s photo is GParted. I love and practice it. It’s convenient and simple to do whatever you want with partitions. I couldn’t decide what to use as the main image for the article. Let it be my current partitioning scheme 😄
I reinstall systems fairly often, a couple of times a year. The reasons vary: I built a small server, swapped my work PC for a laptop, or upgraded my parents’ computer with a larger drive… Just little things, really. I believe I have extensive experience with both Windows and various Linux distributions. This article is mostly just chit-chat, so please don’t take offense. If someone happens to discover that comments have been allowed on the site for half a year, I would be sincerely glad 😄
Partition Table Type 
I used to think: “Well, there’s the old good MBR, and GPT was invented with their cursed UEFIs to run on laptops and prevent people from installing other operating systems! The 4-partition limitation - so what? If you want more, use logical partitions.” I thought this way until January 2022, when I received a laptop for work, and of course, I started thinking about how to set it up. “I’ll try GPT; I’ve never used it before. Let’s see if it works, what’s the difference?” The result: GPT UEFI forever! Why…
- There’s no limit on the number of partitions.
- There’s no bootloader area at the beginning of the disk, meaning that the BIOS doesn’t load the disk by following a link at the start, but rather a specific program found on one of however many FAT32 partitions.
- GRUB sees all the neighbors on the disk, and so does the BIOS, as it turns out that the entry point is exactly the same UEFI program. You can access the BIOS from the bootloader menu, then back to the bootloader, then again to the BIOS, you get the idea…
- When you install Windows and it wipes the MBR without asking you (I won’t express my eloquent, uncensored opinion about Microsoft’s respect for products not developed by them), and then you need to restore GRUB from a LiveUSB, or maybe some system update failed. It doesn’t matter what happened. You just boot another OS straight from the BIOS! I really liked that.
- A downside, but really just a minor one, is that UEFI programs can only be on FAT32 partitions. Well, that’s okay. I created it and forgot about it.
- Windows wasn’t initially planned, but when it appeared, it turned out that it could be installed on any partitions in order, not just the first one as in the case of MBR, which is a huge plus.
File Systems 
I switched to BTRFS everywhere, on my work machine, server, and even the archive partition (auto, moto, photo …) is also on BTRFS. I really love and respect it; I tried it recently as well. I looked for various performance benchmarks and realized that on average, BTRFS is about the same as EXT4 but slower than XFS. “To take it or not to take it?” I wondered. So I took it for one simple and clear reason: my machines are not high-load servers, and I wouldn’t feel the performance difference 😄 I’m satisfied with my choice.
- I have BTRFS RAID1 on two 1TB Barracuda HDDs on my home server - a software RAID, with no problems and at the first attempt.
- Built-in features: compression, defragmentation, error checking (which can indicate when drives are dying), snapshots. It’s a dream!
- It turns out GRUB loads BTRFS and boots from BTRFS without any issues!
- It’s a pity there’s no built-in encryption. I had to layer dm-crypt on top - and no worries, everything is excellent.
- BTRFS is like a logical partition with rubber partitions inside, which aren’t arranged sequentially as we are used to, but simply exist, all at once 😄 No need to add space if it runs out or think about what will consume how much.
Interestingly, I had to migrate the OS from one hardware to another. Here’s how it looked with BTRFS.
| |
I have never migrated so easily and simply. Just remember to do the following manually later:
- Fix UUIDs in
/etc/fstab - Update
/etc/hostname grub-install ... && grub-mkconfig ...
GPT Partitions 
- If Windows needs more space, I’ll shrink Manjaro from the end.
- If I need another Linux, it will also need an EFI partition, but the boot partition isn’t necessary! Because multiple Linux systems can boot from one BTRFS boot - just different (subvolume) partitions.
Operating Systems 
- It’s hard to imagine anything better than Manjaro. I really like everything - documentation, utilities, ease of kernel update control with mhwd-kernel, compatibility with all Vanilla Arch documentation. Fresh software, but not as bleeding-edge as Fedora, which is also nice! There’s mari0
- Windows 10, just for games and Steam.
Important Notes 
- Windows does not ask anyone and formats partitions with the
boot,espflags in FAT32 and puts its EFI there. This was resolved by manually creating the EFI-Windows partition and setting these flags. Linux doesn’t care where they are - it doesn’t affect booting, but the Windows installation fit in the space I needed. - Initially, I didn’t separate boot, and it was also encrypted! It works perfectly! One downside: GRUB does not pull drivers and uses software-implemented algorithms for decryption, without leveraging CPU hardware capabilities. The initial decryption took me 5-7 seconds. People online complained about tens of seconds… For me, those 5-7 seconds were not critical, especially since it doesn’t affect work later, just at the beginning of the boot. However, I decided to remove that delay; I also don’t need paranoid security.
- To restore the bootloader, you also need to mount efivars before chrooting.
- Here’s excellent documentation on bootloader recovery.
- It’s hard to find better documentation on system installation than this for an encrypted partition.
- UUIDs in
/etc/fstabmust match those you need from the output ofblkid.
Unimportant Notes 
- This is what my boot screen looks like thanks to plymouth. Theme Pack 2 - Flame. (the image flickering only occurs in the browser; during boot, it’s smooth)
- I chose a theme for Grub here. This is the one I took.
- dm-crypt can be patched to create a nuke password. If entered, it destroys all keys, and the partition can no longer be decrypted. No matter who steals it, they will never be able to use it.
Grub recovery script 
| |
Simple Explanation of OS Booting (EFI) 
- The BIOS starts up and finds all FAT32 partitions that contain an EFI folder and the familiar files. It loads one of the programs it finds, as requested.
- The EFI program is not as limited as MBR; it can do pretty much anything. In our case, it accesses the
/bootpartition with GRUB, discovers BTRFS, and loads the GRUB menu. This is where the theme we chose for GRUB is displayed. - Now, we select what to boot from the GRUB menu.
- GRUB loads the entire initramfs of the selected operating system into RAM. This is what we generated with the mkinitcpio command. Initcpio is a program similar to EFI, but when it was created, EFI didn’t exist yet; only the limited MBR was around. I have a feeling that you could boot the system directly from EFI without the extra layer, but that’s another story… Also, along with initramfs, the kernel is loaded here since it’s also stored on
/boot. - Initcpio is a layered cake of hooks that are executed sequentially. Each one does something important and necessary. If we installed Plymouth, then right here, in one of the very first hooks, some beautiful graphics are drawn on the screen to hide a bunch of loading logs.
- One of the hooks is encrypt or plymouth-encrypt. This particular piece of the initramfs cake asks us for the password for the encrypted root. Up to this point, it hasn’t been accessed at all 😄
- Decryption, creating the first process, starting services, drivers, the graphical shell, and the whole process of booting up.
Conclusion 
I hope the article helped someone or provided some information. If you have suggestions or ideas, feel free to contact me!